Repository navigation
Tutorials Annotation
Use Annotation to apply one of the codes in a Codebook to each source row, either directly or with predictions from a configured AI provider.
-
Under Annotation Data Block, add one Data Block and choose the text column.
-
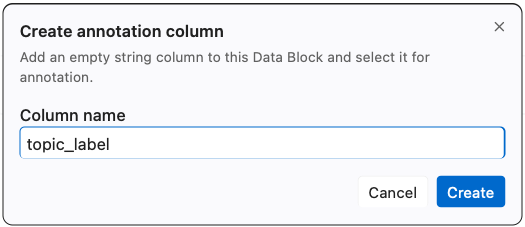
Under Annotation column, select an existing text column, or choose Start new annotation and name a new, empty column. This is an immediate Data Block Edit.
-
Under Codebook, add a Data Block and map its code and description columns. Use Create new when you need an empty Codebook, then click Edit beside Codes to add, rename, or remove codes and their descriptions before labelling.
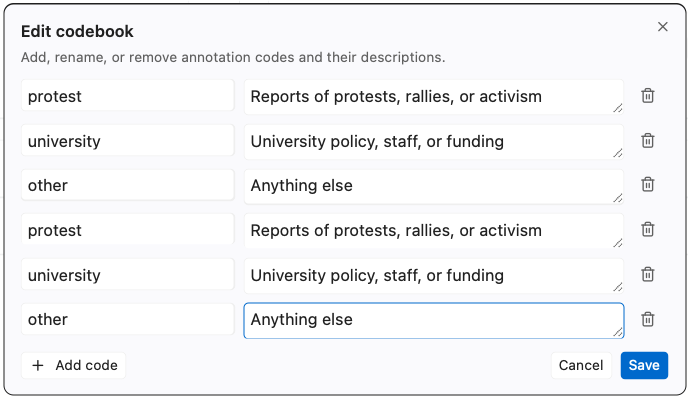
Each code should appear once, with its own description. If a code is repeated, or two codes share a description, the Codes card and the Edit dialog say so and suggest a fix: remove repeated rows, choose one of a code's descriptions or merge them, or give each code its own description. AI Preview and Run wait until each code has one description.
Task context (optional, at the top of the Edit dialog) says what the texts are and what the codes are for, for example "Posts from a workers' forum, 2019 to 2023; the codes record attitudes to working from home". It is saved with the Codebook, so it goes wherever the Codebook is used, and AI annotation sends it after the Prompt, before the codes. In the Codebook Data Block it is one row named
__task_context__; that row is never a code. -
Use the Manual / AI switch to choose a mode. The source and Codebook are shared between both modes.
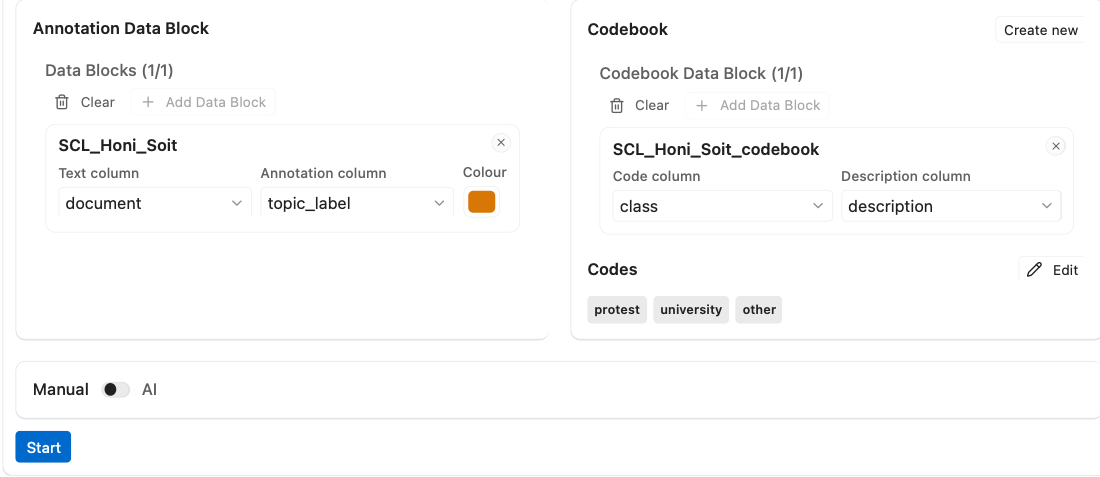
Choose Start to open the annotation table. Select a Codebook value for each row from its Select code list; each change is written directly to the annotation column as a Data Block Edit. Start captures the source, annotation column, Codebook mapping, and table inputs. You can edit the setup as the draft for the next table without changing the open table. Choose Close even if that draft is incomplete; the next Start captures the new setup. Switching modes hides but does not rewrite the open Manual snapshot.
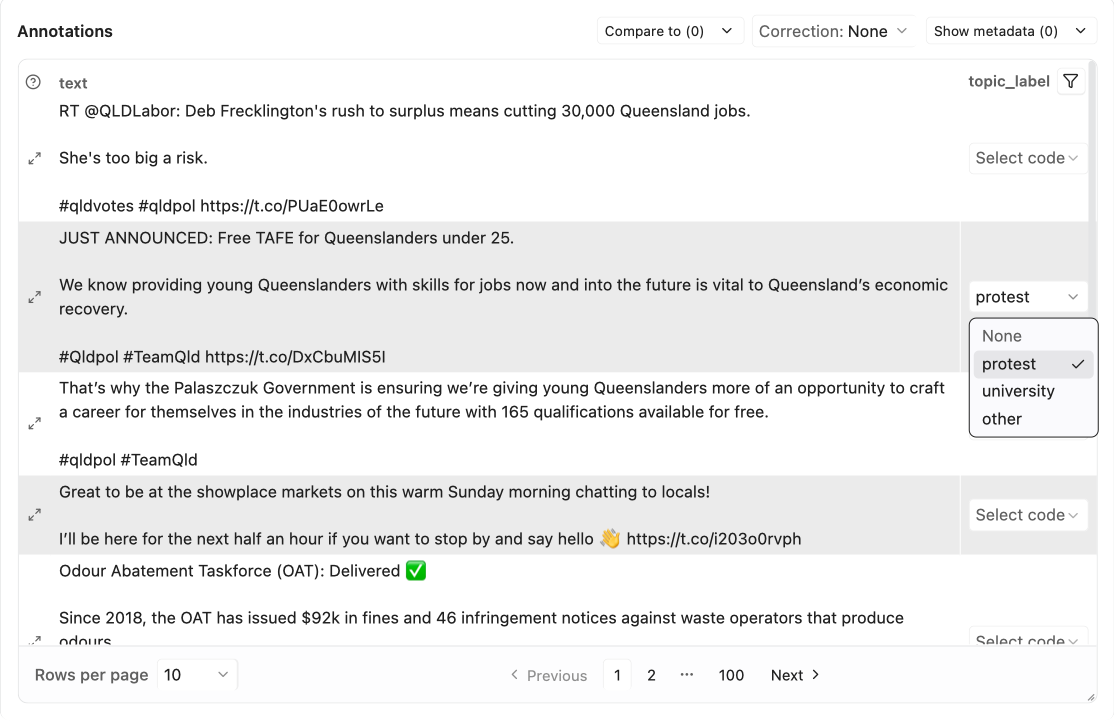
Use Compare to to add another coder or model. Each comparison starts masked
as ••• so you can code without seeing how individual rows were coded. Its
header always shows the reliability score (hover or focus it for the confusion
matrix) and the row-filter menu; reveal the column from the eye button to show
its values and difference colours. Removing the filtered column clears the
filter; hiding it does not. Reliability statistics summarise agreement but do
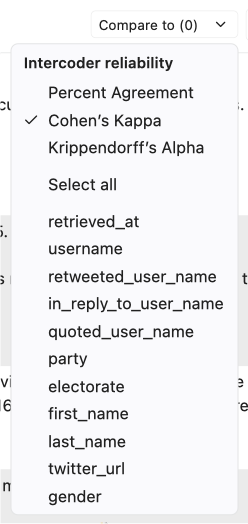
not explain why labels differ. Choose the statistic at the top of the Compare
to list: Percent Agreement, Cohen's Kappa (the default), or
Krippendorff's Alpha.
The funnel button in the annotation column header and in each comparison header opens a filter menu with two independent conditions: Differs and a value radio (All rows, Has value, Empty). On a comparison column, Differs keeps rows whose label differs from the annotation column; on the annotation column it keeps rows that differ from at least one selected comparison column. Conditions combine, so Differs with Has value narrows further, while Empty greys out Differs because an empty cell never differs. Only one column carries a filter at a time; setting a filter on another column replaces it. Filtered rows and counts are calculated before server pagination. Preview has no row filter because its rows are chosen by the AI request.

A cell counts as empty when it is blank or holds a value that is not a
code in the Codebook (for example P instead of promise, or a date pasted by
accident). Such values are still displayed, in muted italics, but they never
count as differences, never contribute to reliability, and match Empty
rather than Has value. Matching is exact after trimming spaces; Promise
is not promise. Without a Codebook only the blank rule applies.
The table fills the space below the parameters, so dragging the bar between the parameters and the results shows more or fewer rows. To set the table's own height, drag its bottom-right corner; double-click the corner to let it fill the space again. The height is shared by Manual, Preview, and Review, and the table scrolls inside its frame when a page does not fit.
Drag a column header's grip to move the column; a correction column and its arrow stay beside the annotation column. The tab remembers the order.
Compare to and Show metadata are exclusive roles: a selected column is disabled in the other menu, and Select all skips disabled columns. The active correction column appears in neither menu. Add a correction column when you want reviewed decisions kept separately, and use metadata columns to retain useful source context in the table.
Long metadata values wrap within their column. To read a whole row, select the View row button (the expand icon, View the whole row) at the start of the row in the Manual, Preview, and Review tables. It opens Row Details with the full text and every visible column in table order: the annotation (or the predicted label beside the existing annotation), any correction, Compare to columns, and metadata. Comparison values stay hidden until you reveal that column, and the viewer is read-only; use Previous and Next to move between rows.
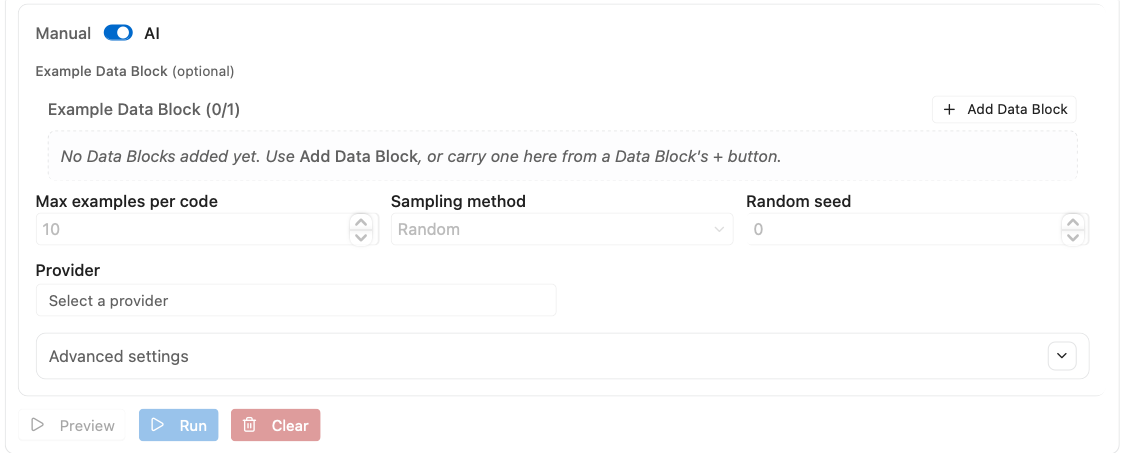
Choose a Provider (a connection you set up) and a Model; both are always shown, since they decide where your text is sent. Provider credentials stay in Settings and are attached only when the request is sent. On a Wordflow server, your connections and keys are saved in your web browser, not on the server, and only for the account you're signed in with: they stay after you sign out or close the browser, another account signed in on the same browser can't see or use them, and in a different browser or a private (incognito) window you need to enter them again. On a shared computer, delete them when you finish. Create or edit connections under Settings → Servers, in Generative AI (the AI tab before 0.7.16). API keys are optional when saving, but a built-in provider marked Needs API key cannot list models, Preview, or Run until you add one. Custom endpoints may be keyless. Editing a key updates future requests; a Run already queued or running keeps the key captured when it was submitted. A server may also provide its own providers, listed first and marked Provided by this Wordflow server: they need no key and can't be edited, and one may limit Requests at once, so your next Run with it waits until your current one finishes. When the provider describes its models (OpenRouter, Google, or a LiteLLM gateway with model descriptions set), the Model list shows a one-line description under each model to help you choose; the model name is still what is used. Models the provider marks as another kind, such as embedding or OCR models on a LiteLLM gateway, aren't listed: they can't annotate. A new tab starts with the model last chosen or run with that provider in the same Project, on this computer. If the Project hasn't used the provider yet, it starts with the provider's Default model from Settings, if you set one, or the server's default for its own providers. Choosing a model in a Project never changes the default in Settings. The rest of the AI settings are advanced: turn on Advanced at the top right of the Annotation parameters to see them, listed under Advanced settings. With Advanced off, Preview and Run use no Example Data Block, the default prompt, and the default for every setting below; what you had set is kept for when you turn it on again. Choosing Use as example beside a correction column turns Advanced on.
An Example Data Block is optional; if used, choose both its text column and an existing annotation column containing reviewed labels. Set Max examples per code, then choose Random, First N, or Last N. Random sampling also accepts a nonnegative seed and defaults to 0. The same Data Block snapshot, maximum, method, and seed produce the same per-code subset throughout one Analysis; groups with fewer examples contribute every usable row.
Advanced settings also include the instruction prompt, the settings for the selected provider, and the Run settings. Each provider's settings offer Thinking (the model reasons before it answers; see Thinking for when to turn it on) and, where the model uses it, Temperature (lower gives more consistent answers). Anthropic has no temperature setting. Below them, the Run settings apply to every provider: Which rows to annotate (Only rows without an annotation, the default, or Annotate all rows again), Rows per request (how many rows go to the model in each request), Requests at once (how many requests Run sends at the same time: 2 for a Custom provider, 10 for the others, kept for each provider), and Retries if a request fails. A server on your own computer usually works on one or two requests at a time; set Requests at once to its own limit, so requests don't wait in its queue until they time out. Defaults are a good starting point. Change one setting deliberately, because provider capability, cost, latency, and repeatability vary by model.
Thinking is off by default. With it off, the model answers with the labels straight away, so Preview and Run are much faster and cost less.
Turn it on when the codes are complicated: subtle distinctions, codes that depend on irony or stance, or descriptions with several conditions. The model then reasons before it answers, which can make the labels more precise. The trade-off is cost and speed: the reasoning can take thousands of extra output tokens per request, which you pay for, and each request takes longer. Thinking effort (low, medium or high) sets how much room the model has to think; more room can help hard cases and costs more.
To decide, Preview the same rows with Thinking off and on, and compare both with rows you have labelled yourself. Keep it on only if the labels clearly improve.
Not every model can think. For a Custom provider, Thinking off also turns off the thinking of models that think by default, such as Qwen on oMLX or vLLM; turn it on if you want them to think.
Choose Preview to see predicted labels for a sample of rows without writing to the annotation column. Page through the predictions, compare them with existing labels, add corrections if useful, then revise the Codebook, examples, model, or settings when the errors show a pattern. Pages you have seen are kept with the tab and saved with the Project, so going back to a page, reloading or reopening the tab doesn't ask the provider again; a new Preview or Clear removes them. Preview waits as long as the provider allows; choose Stop when you no longer want to wait. After a Preview, the button turns on again when you change a setting. See How Preview, Run and Clear work.
Choose Run only after Preview is satisfactory. Run uses the same data and settings as that Preview and writes labels to the selected annotation column. The Review table reflects the current Data Block and supports the same hidden-first comparisons, row filters, reliability, metadata, resizable frame, and correction controls. A reviewed correction column can also be selected as the Example annotation column for a later run.
Run sends each distinct text once: rows with the same text, such as repeated replies or retweets, share one answer, so the provider is asked (and paid) only once for them. While Run works, Tasks shows how many texts are classified so far, about how long is left, any failed batches, and that the run is waiting for the AI provider between answers. A slow provider can take minutes per batch; the run is still alive while Tasks keeps updating.
The labels that have come back are kept as the run goes, in a temporary Data Block named after yours with annotation in progress (the text column and the annotation column, one row per distinct text). When the run finishes, its labels go into the annotation column and the temporary Data Block is removed. If the run stops before that (you click Stop, close the tab, Wordflow or the computer restarts), the temporary Data Block stays, so the labels already paid for are not lost. The Annotation tab then offers Write them into the column, which fills the rows with those texts and keeps every other value, and Remove. After writing them, it says which rows the next Run sends. With the default, Only rows without an annotation, Run sends only the rest; if the tab is set to Annotate all rows again, it offers Annotate only the empty rows. The tab keeps that choice for later Runs; change it under Advanced settings (turn on Advanced first). You can also join the temporary Data Block to your Data Block on the text column yourself.
A request that times out or finds the provider busy is tried again (see Retries if a request fails). If it still fails, its rows count as failed and the run goes on. If three requests in a row fail that way, or the provider never answers, the run stops; the labels that came back are kept as above. Other provider-wide failures, such as a wrong API key, are shown in Annotation and Tasks and write no labels. When only individual rows cannot fit the provider context or produce a valid response, successful rows are published and a warning reports failed rows and batches. Failed rows keep their existing values in Annotate all rows again and remain blank in Only rows without an annotation; a successful explicit empty prediction may still clear a value.
The download icon above the Annotations table, and above the Review table after a Run, saves the annotated Data Block (all its columns, with your codes) as CSV or Excel, without going through the Export view.
Clear removes the tab's Preview and Run results; it does not undo labels already written to the Data Block. Use Undo in the Data Editor to reverse the latest manual edit, AI write, or column creation. Undo history lasts only until the Project is closed.
Settings are locked while Preview or Run is working. After a failure or a stop, you can edit the settings and choose Preview or Run again straight away; the new Preview or Run replaces the tab's earlier results, so Clear is not needed first. Tables on screen keep the settings of the Preview, Run or Start that made them while you edit the next setup. See How Preview, Run and Clear work.
Before using labels downstream, sample every code, inspect uncertain or costly errors, and record who or what produced the labels. Treat AI predictions and agreement scores as evidence for review rather than proof of correctness.